The block types and their encoding

The classic Tetris we’re all familiar with has seven block types. That means that every grid location on the board can have one of eight states, including no block at all. Eight is a serendipitous number, being a power of two. So just for fun I got to thinking how I could minimize the memory needed to store the board. If there are eight possible states for each grid location, then only three bits are needed to store its state.
Our board is ten columns wide, just like the original. If we use three bits per grid square, and ten grid squares per row, that means we just need 30 bits to store the row! An entire row of our game board could comfortably fit inside a single 32-bit word. I created a spreadsheet to help me plan out the bit structure of our rows. The images above and below are screenshots from that spreadsheet.
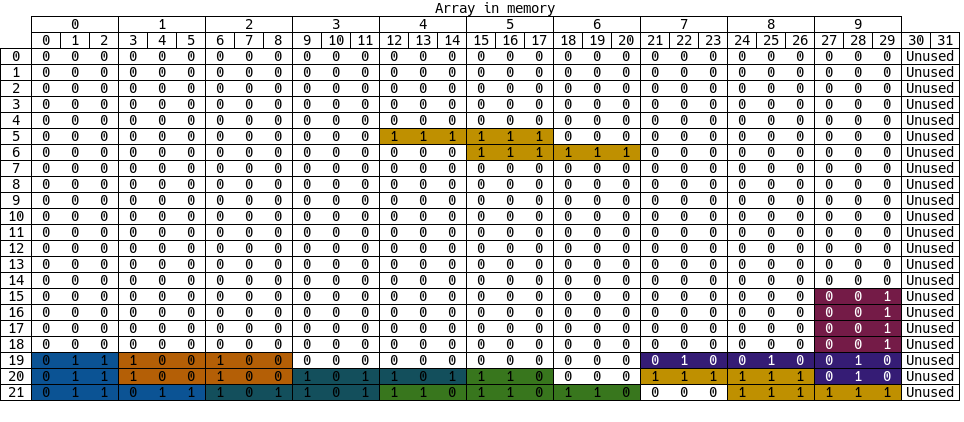
The table above shows each bit of our game board array. Each row is a single 32-bit word. Each block type has a different 3-bit encoding, with an empty space being represented by three zeros. One of the tremendous upsides of this is that we can check if a row is empty with a single assembly instruction!
The game board
This compact method of representing the game board came at the expense of code size and complexity. I’m not sure I would chose this method again, it complicated things and made debugging more challenging. But this was a class project, not a contracted job! It was great to practice the bit-twiddling requited to access the value of a single grid square. Let’s take a look at some of the code I wrote to interact with this data structure. Because keeping copies of the entire game board is so cheap, memory wise, the Display class remembers the old state of the board. This allows us to only transmit the changes to the screen, reducing the refresh time drastically.
1
2
3
4
5
6
7
8
9
10
11
12
13
for (int row = 21; row >= 0; row--) {
  new_row = new_board[row];
  // If this row of the board hasn't changed, then don't render it!
  if (old_board[row] == new_row) continue;

  // Now we want to go through every column on this row
  for(int col = 0; col < 10; col++) {
    bitmask = 0x7 << (col * 3);
    // If this grid square hasn't changed, then don't render it!
    if ((old_board[row] & bitmask) == (new_row & bitmask)) continue;

    // At this point we know the square we are looking at has updated
    new_block = (block_t) ((new_row & bitmask) >> (col * 3));
The code snippet above comes from a C++ class method that renders the block squares to the screen. I chose to start at the top of the board (i.e. the loop starts at 21) and work my way down because there is a visible lag as the microcontroller updates large parts of the screen (like when many rows are eliminated at once). This will give an effect of the pieces moving down, as higher rows are rendered first.
I use the continue keyword twice to speed up the loop and only calculate and render what is necessary. The first continue, on line 4, detects the case when nothing on the row in question has updated. The second continue, on line 10, selects the specific grid square in question and continues the loop if it has not changed. These two optimizations to the render function are absolutely necessary to ensure that the refresh time is acceptable. There is no perceptible delay between pressing a button to move a block and the block moving on the screen. This is despite the refresh time for the entire screen taking almost two seconds! The rest of the loop calculates the pixel coordinates and color of the block to be updated, and calls the screen driver class to actually transmit the data over an SPI link to the screen module.
Extra, hidden rows
The data structure that I have described so far served us well for the first two weeks of prototyping, but we ran into issues when we wanted to create new falling blocks. At first we just plopped them into the top few rows of the screen, but this didn’t feel natural. Even worse, the player isn’t expecting to loose until the last row is taken up with blocks, and there might not be room to place a new block directly onto the screen. We needed the blocks to start off screen and fall down onto the screen. This forced us to re-think our game board data structure. We decided to add a few hidden rows above the visible part of the screen. This allowed us to place a new block out of sight and move it down onto the screen. I originally intended to index our board in the same way that the pixels are indexed on the screen, with (0,0) being the top right corner, but these new hidden rows made that difficult. I chose to flip the array and assigned (0,0) to the bottom right instead. This made more intuitive sense as the falling blocks decrement their row index.
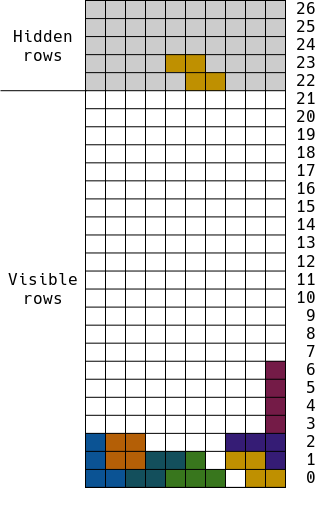
The image above shows the extra, hidden rows shaded gray. One of the unanticipated benefits of this extension to our data structure was that it made detecting the end of the game trivial! When it is time to spawn a new block, we check row 22, and if that integer is non-zero, then the game has been lost!